Zoom Live Transcription
UCSC Zoom now includes Live Transcription that uses automatic transcription to turn the spoken word into text, in real-time for each Zoom session.
The Zoom host can decide to enable this feature at the beginning of each Zoom session. Participants will not have access to the Live Transcript option unless the host enables it.
Benefits
Once enabled by the host, the feature provides the ability to turn the spoken word into text, in real time as subtitles, transcript or both. The transcription appears during the Zoom session and is visible to all participants.
This feature can be used to enhance the general accessibility of a Zoom session and is also helpful for:
- Individuals who benefit from captions to improve overall understanding.
- Situations to compensate for low audio quality and enhance understanding.
- Situations where individuals are unable to keep their volume up due to sharing their work or study space with others.
Zoom Live Transcription should be used for accessibility, not for accommodation.
- Students with disability-related needs should consult with the Disability Resource Center.
- Staff and faculty should consult with Disability Accommodations and Resources.
Things to consider if you enable this feature:
- Only the host can enable Live Transcription. Participants will not have access to the Live Transcript unless the host enables it for each Zoom session.
- The Zoom session transcript can be saved by the host AND by the participants. If the host doesn't want the participants to be able to save and download a copy of the transcript, the host must disable Save Captions in the Zoom web application settings BEFORE the session begins. Instructions
- Accuracy of the transcription depends on audio input from the speaker, including the speaker's accent, voice modulation, and intonation.
- This feature is not currently available in Zoom Breakout rooms.
- This feature is not available in Zoom for HIPAA accounts.
- This feature does not work with Linux machines.
Subtitles:
This feature does not create subtitles in the Zoom recording. Subtitles only appear during the live session.
- Hosts who want subtitles to appear in the Zoom Cloud recording need to turn on Zoom Audio Transcription and then share the recording from the cloud. Zoom Cloud recordings are stored for 30 days.
- Hosts can also transfer Zoom recordings to Yuja Media Management for long term storage and post-production captioning in multiple languages.
- Instructors can reference Keep Teaching for details with Canvas, Zoom, and Yuja for courses.
Using Live Transcription
As a Host
Turn On Live Transcription
Make sure you are running the latest version of Zoom before you enable Live Transcription.
1. Start your Zoom session.
2. Click Live Transcript from your Zoom toolbar at the bottom of the screen.

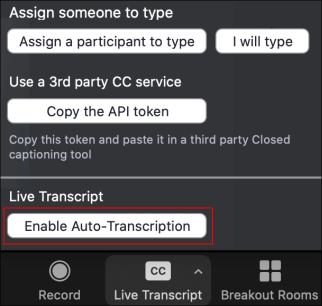
If the meeting is being recorded to the Cloud, and you have enabled Live Transcript, you will receive a copy of the transcript [referred to CC] in the same location as your recorded meeting. For local recordings or non-recorded Zoom sessions, the host can manually save the Live Transcription.
Turn Off Live Transcription
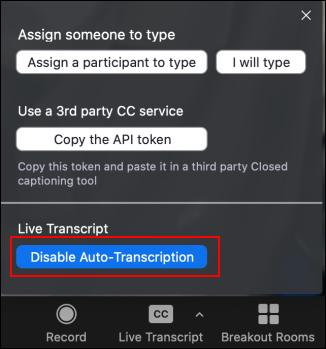
4. To turn off Live Transcription, click Disable Auto-Transcription in the Live Transcript menu from your Zoom toolbar at the bottom of the screen. NOTE: When you END your Zoom session, Live Transcription will automatically close.
Subtitles
1. With the Auto-Transcription enabled and running, you will see transcripts displayed as subtitles.
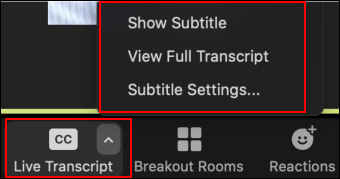
2. To disable the subtitles, click the caret (^) above Live Transcript and select Hide Subtitle.
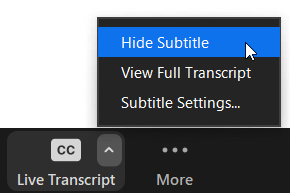
3. To adjust your subtitle settings, (change the font size) click the caret (^) above Live Transcript and select Subtitle Settings.

Transcripts
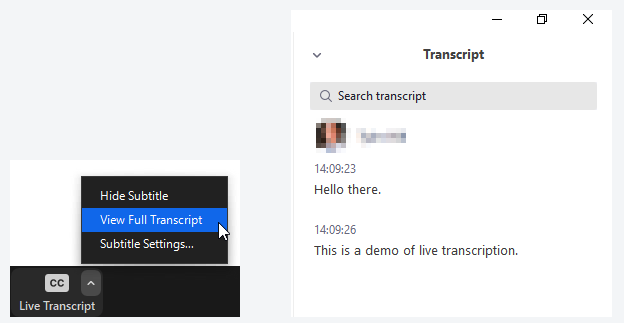
1. To view the full transcript, click the caret (^) above Live Transcript and select View Full Transcript.
Saving the Transcript
NOTE: The Zoom session transcript can be saved by the host AND by the participants. If the host doesn't want the participants to be able to save the transcript, the host must disable Save Captions in the Zoom web application settings BEFORE the session begins.
Disable Save Captions
1. You will need to disable Save Captions BEFORE the Zoom sessions begins.
- Log in to your UCSC Zoom account with your CruzID and Gold password at https://ucsc.zoom.us/
- Click on Settings and scroll to the Save Captions area under the In Meeting (Advanced) section.
- Click the blue/white circle area to toggle off.

Save Transcript
2. If the host is okay allowing all participants to save the transcript of the Zoom Session, click Save Transcript at the bottom of the transcript window.
As a Participant
Once Live Transcription is enabled by the host, participants have the option to choose how they want to view the auto-transcription feature.
Tips for using Zoom Live Transcription
- Use an External Microphone: An external microphone/headset provides better audio quality and more accurately matches what is being said verbally.
- Speak Slowly: Slowly speaking enables a more accurate match to what is being said verbally and allows others to follow the automatic transcript or subtitles.
- Take Turns/Pause Before Speaking: Zoom's active speaker tracking is used to identify the speaker. When another individual begins speaking, it can take a second or two before Zoom updates the transcript to recognize the new speaker.
- Monitor the Participants Panel for the Go Slower function: Zoom's Participants panel displays all attendees and shows any nonverbal feedback the attendees provide. When using automatic live transcription, consider keeping the Participants panel open to see if attendees indicate they need speakers to Go Slower.

Live Transcription Settings
The Zoom system default is set to enable Live Transcription for everyone at UCSC. If you'd like to change these settings for your Zoom account:
- Log in to your UCSC Zoom account with your CruzID and Gold password at https://ucsc.zoom.us/
- Click on Settings and scroll to the Closed Captioning area under the In Meeting (Advanced) section.
- Click the blue/white circle area to toggle on/off.

Other Resources
Lecture Capture and Captioning with Zoom and Yuja

